Showing posts with label tech. Show all posts

Tuesday, April 23, 2013

[Blog Design Tips] Reducing Right Click on Your Images

Hannah from With Real Toads asked: ...I was wondering how you went about hindering copy/paste ability from your readers? I'm Word Press so I don't know if it'll work the same? 

As bloggers, we work very hard trying to make our blogs unique and one way we do that is with the images that we take and use for our posts. What's aggravating is when all this hard work is "right clicked" away. To reduce and deter the casual viewer from simply right clicking and copying your images, here is a way to disable that feature. Please note that there are ways around this, so for the savvy user, they can still grab your image.

Unfortunately, I am currently only working on the blogger platform, but if you are a wordpress blogger, try the link below. Let me know if it works. If not, I will look for a solution.

For Wordpress, I suggest trying this plugin No Right Click Images Plugin

For Blogger users, follow the steps below.

1. Copy this code

<script language=javascript>
<!--

var message="This function is NOT allowed!";

///////////////////////////////////
function clickIE4(){
if (event.button==2){
alert(message);
return false;
}
}

function clickNS4(e){
if (document.layers||document.getElementById&&!document.all){
if (e.which==2||e.which==3){
alert(message);
return false;
}
}
}

if (document.layers){
document.captureEvents(Event.MOUSEDOWN);
document.onmousedown=clickNS4;
}
else if (document.all&&!document.getElementById){
document.onmousedown=clickIE4;
}

document.oncontextmenu=new Function("alert(message);return false")

// -->
</script>


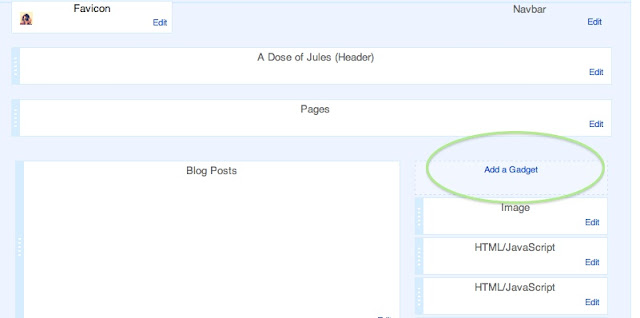
2. Go to Layout and click on Add a Gadget


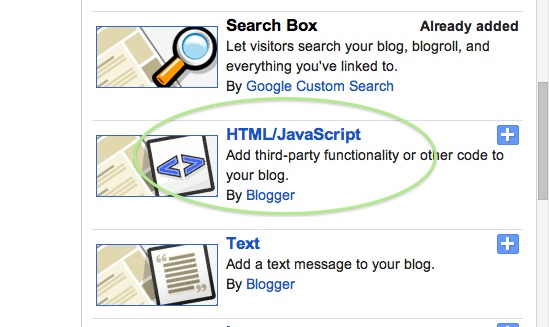
3. Choose the HTML/JavaScript option


4. Paste the code and save
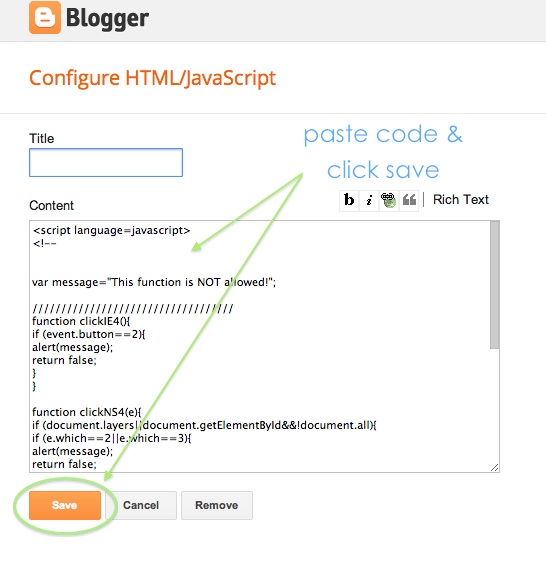

You can change the message by altering the highlighted text that reads "This function is NOT allowed!"

You may also want to disable the image enlargement feature.

I hope this is helpful. Please let me know if you have any questions. I am eager to learn and help fellow bloggers.

Please let me know if this works for you. I did this awhile back, so I may be forgetting something.

[Blog Design Tip] Disable Image Enlargement Feature

In the last Blog Design Post, I showed you how to keep visitors from copying/right clicking your images.

However, you may have noticed that when you click on the image, another window opens containing your image, and visitors can easily snag your picture from there. To prevent this, you will need to do the following when you post.

Unfortunately, you will need to do this each time you use an image in your blog post. But, it's worth it.


1. After posting your image, you will need to click the HTML link


2. You will need to find and delete the highlighted sections. The actual addresses for your images will vary.


3. That's it!

I hope that you found this helpful. If you have any questions, let me know. I'm still new to things, but I love learning about code and helping fellow bloggers!

Let me know if this worked.

Monday, April 1, 2013

{Blog Design Tips} Author Comment Section - Color Change

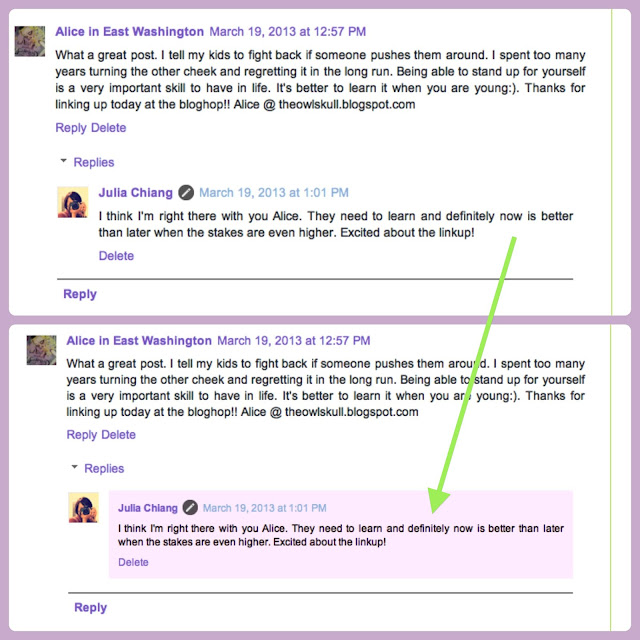
Do you want to add some color to your author comment section? Do you want a background color? In this tutorial, I will show you how I changed the color of my author comment box on my blogger blog to a different color.


So this is what I did:


1.  Go to your Template section and click on Edit HTML


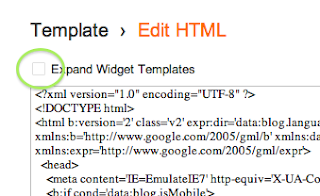
    2.  Click Expand Widget Templates


    3.  Find (use command F on mac)
    </body>

    4. Copy and paste the following code right above it
    <script src='http://code.jquery.com/jquery-latest.js'/>
    <script>
    $(function() {
    function highlight(){
    $('.user.blog-author').closest('.comment-block')
    .css('border', '1px solid #FFF0FF')
    .css('background','#FFF0FF url("http://www.blogblog.com/1kt/transparent/white80.png")')
    .css('color', '#444444')
    .css('font-size', '12px')
    .css('padding', '10px');
    }
    $(document).bind('ready scroll click', highlight);
    });
    </script>


    Line 6: Change border color by altering #FFF0FF
    Line 7: Change background color by altering #FFF0FF

    Click here for color choices.

    Voila!!! You've got yourself a new look! Yippeee....

    I'm so thrilled with my new background color.....can't wait to do more.

    Send me your links so I can check out your changes.....have fun!

    Happy Coding!

    Tuesday, March 26, 2013

    All Things Techie

    tech·nol·o·gy 

    it's useful
            it's fun
                  it's sexy
                        it's the future
                                    I love it!


    1. For the music lover....look what's coming down the road. Mico Headphones! (read about it here on CNet) It senses your mood and chooses a song for you based on the signals it receives.....very interesting....unless you're totally depressed and it then chooses a song that makes you feel even more depressed....hmmmm they may want to tweak that part! 


    Don't go jogging with these on.....
    Image courtesy of Neurowear

    2. For the photo nut in you....If you are like me and LOVE playing with your images on your phone take a look at beFunky (it's also available on the computer, with more options). What I love about this is that I don't have to share my images once I'm done fiddling with it, as is the case with Instagram....I can if I want to, but sometimes....girls just wanna have fun...(which songstress gave us those famous lyrics?)


    This is my crazy dog!


    3. For the Facebook junkie.....see what the future holds for you! Try these out.....very cool, but kind of scary when you think about it. Price for Power and Take This Lollipop (this one is creepy...)

    Price for Power
    Click here to try

    And that's all things techie from me today....